
Aerial Photography – A Study in Higher Education
By Hillel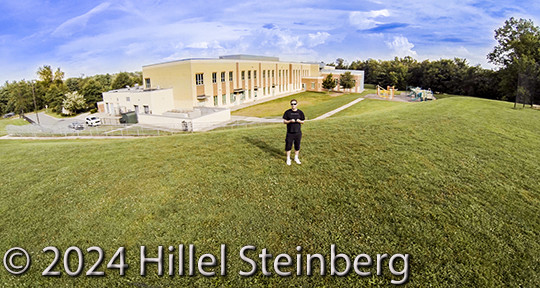
I’ve always been interested in RC devices. In particular, I’ve often been curious about platforms that fly. About twenty years ago I purchased an electric white plane at a hobby shop across the street from my work, but it didn’t last very long. The technology at the time was both expensive and limited – not an exciting combination. Today, there are a menagerie of flying solutions, including the very stable and affordable quadrocopter drones. The geeky “heli” hobbyists will scoff at these platforms, but the truth is they are perfect if you are interested in immersive photography like I am. To tangle with this hobby, though, several steps and some cash are required.
The first thing to do is visualize your end goal. In my particular case, I’m interested in an HMD (Head Mounted Display) with an FPV (first-person-view) from the platform’s perspective of about 30+ meters. While it’s true that one could simply buy all the parts required and jump right in, a better way to achieve this goal is to break the problem down into measurable steps. This will minimize your risk, and set you up for success. For this goal, I have broken the problem above into at least four steps.
As your first step, you can buy a cheap used quadrocopter and practice with it so you understand this particular platform’s flight characteristics and considerations. I bought a used Parrot AR (first version) for $60 off Craigslist to get started. It came with a second battery which is a plus and I would highly recommend this if you are just getting started. These RC platforms often use lithium polymer batteries which can be dangerous and explode, so follow the directions closely, and only use the correct charger and batteries (e.g. no trickle charging!). Take the quadrocopter out to a field so you have a softer landing if you screw up – and you will. Make sure on your first few times that you have plenty of room and there is no wind or strong breeze. Before you take off, make sure you know exactly how to force a landing should you need to abort an oncoming disaster. Because this is presumably a cheaper device, range will be a restriction so keep the platform close and only make small movements with your controller.
Once you are good with the cheap quadrocopter, you’ll want to take a picture or video from it in step #2. The Parrot AR has video capability already, but if your platform doesn’t you can always add a “gum” cam or similar non-transmitting device. You can also attach a GoPro camera to get high-quality video. After realizing that Parrot AR video quality was rather dismal, I used four carbon rods and a rubber band to attach a GoPro Hero 3 to the underside of the platform. Flying in this configuration is a bit more complex. First you need to turn on the Parrot and wait for it to establish a hotspot. Then you need to connect your android or IOS phone. The free Parrot AR app is cool, but I changed the default settings so pitch (forward/backward) is controlled by a simulated joystick instead of the built-in accelerometer. Once you have the Parrot’s view shown on your phone. Turn on the GoPro and put it in either video (say 2.7k cinematic HD) or stills (time lapse @ .5 seconds per frame) mode. When you fly, everything will be quite sluggish with the extra payload, so don’t accelerate quickly (including ascending/descending rates). If you keep the quadrocopter low, you won’t chance breaking your GoPro or video device which can be more expensive than your cheap platform!

Because cheap quadrocopters are limited, your video or stills will probably be sub par, from a lower than desired altitude, with visible shake and exposure issues. The next step is to get a better platform with more range and stability. The DJI Phantom is a popular model today, but the upcoming Blade 350 QX and others are also promising. Whatever you choose, make sure that the platform you buy has good range, agility, can find it’s way home (GPS tracking), can hold a video device (e.g. GoPro), and has a typical flight time of at least 10 minutes. Because you have been flying a cheap quadrocopter for a while, flying the new drone will not seem like a drastic change, but when the platform is higher, you will have a harder time understanding which direction it is heading. Most smarter drones with GPS can find their way home back to its take-off spot if you gave it enough time to get a good location fix on the launch pad.
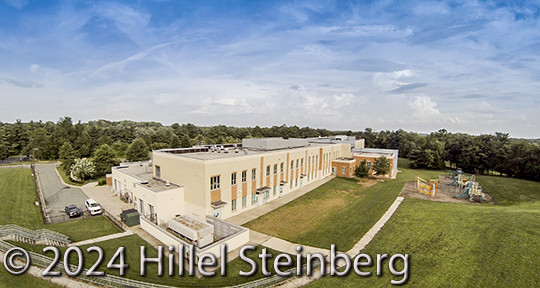
At some point the video will start to approach what you are looking for, but you know you could do quite a bit better if you had a FPV from the quadrocopter. This will require some expensive equipment to transmit video and render it locally on a screen or HMD. Products like Fatshark offer quite a variety of solutions in this area. With a 600mw transmitter and a middle tier HMD package, you should be able to get a reasonable FOV (field-of-view) perspective from the platform. Your fun at this point will literally climb to new heights. The batteries on quadrocopters such as the DJI Phantom often have an extra cable to power video transmitters. The Fatshark transmitters can use the direct output from the on-board GoPro’s video port. This combination should produce stunning results.
The problem is you may not be able to operate the Fatshark (or equivalent) without a technician’s radio license depending on your location and regulations. There are a variety of regional laws that enforce which frequencies, transmission power, and radio characteristics that can be used by amateurs. Taking a course (or just reading the handbook) and passing an technician exam will not only get you a license to operate many transmission devices you may need for your drone, it will also teach you a lot of useful stuff about RC devices and their theory of operation. Once you have passed the class, you will receive a call sign which you can affix to your video receiver. Try not to operate your quadrocopter near street cables or radio towers and keep your video transmission under 1w to avoid issues. You can also improve the antennas (e.g. cloverleaf) on both your platform and your base receivers.
Private drones and aerial photography are becoming more popular and affordable each year. Without too much work or money, if you are enthusiastic and patient, your results will be stunning and the feeling you get with a live FPV from an aerial platform will more than make up for the MacAir you had to sell to get started with this popular hobby.
[whohit]-DRONE-[/whohit]