

The 360 Degree Panorama – Introduction

A great way to immerse your client is to create a 360 degree panorama. A 360 degree panorama is quite difficult to create. To give you an example, the panorama shown below was created using a Nikon D300 on a Bogen tripod. To pivot the camera around it’s Nodal point, a special device called a Nodal Ninja was used. In order to capture all 360 degrees, 15 images were taken at steps of 24 degrees for each row. Five complete rows were taken to capture all 180 degrees of scene vertically. The focus, focal length, lighting, white balance, and speed were all manually computed and fixed to ensure consistency throughout the images. Each 12 megapixel images was shot in RAW mode to limit processing. Special software was used to stitch the 75 images into a Quicktime panorama. Finally, the Quicktime move was converted into a Flash panorama for the web.
Given that so many photos have to be taken in succession without moving the base, it is important to remember to firmly plant the tripod legs before capturing the panorama. As you walk around the rig and rotate the lens, be sure not to trip on the legs or snag the camera strap. If you take each photo as a triple bracketed exposure, you will have a better chance of making sure you captured the moment. Unfortunately, you will end up with three times more photos. Your choice. Either way, take care to take every shot. Remember, you will end up with a “hole” in your panorama if even one photo is missing during the stitching process.
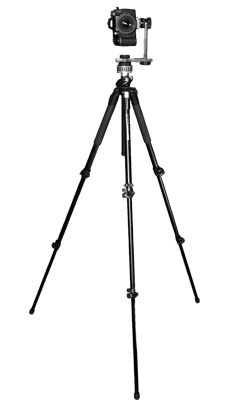
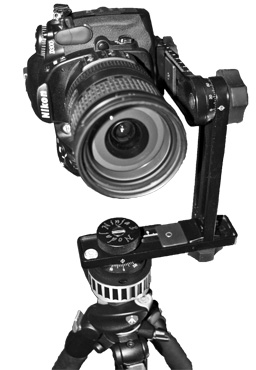
The rig is shown below. On the left is the full Bogen tripod with the Nodal Ninja and the D300 attached. The horizontal and vertical alignments have been set to center the 18-200mm lens over its nodal point according to a settings chart. For the purpose of this exercise, the lens is set to 18mm so it is pulled out all the way. This is necessary to minimize the number of shots that need to be taken. Also, as the focal length is set longer, the nodal point moves. At some point, the Nodal Ninja is unable to accommodate the focal setting. On a good note, the Nodal Ninja allows the camera to be pivoted on its side as shown below. This allows for more resolution in the vertical direction and minimizes the number of rows which need to be taken.
Several examples of the final results can be see by clicking on the links below. Using the mouse and the left button, the viewer can pan horizontally and vertically around the nodal point. To zoom in
or out, click the shift or the control key and use the left mouse button. Here are the low-resolution web-friendly versions of the panoramas.
Although this is just plain street view panorama, because panning is possible in all directions, the viewer is immersed in the scene. The intricate clouds make up for the scene’s ordinary quality.
This view is from a porch and is a bit more interesting and complex. Here, there are also more reflections which are harder to produce correctly because each picture has to be taken without accidentally capturing the panorama author!
Moving into the living room, the immersion is even more intense because the space is confined. Exploring is more fun and it is easy to feel as if you have been magically transported to someone’s home.
Back out on the deck, we are outside once again, but this time we see trees instead of a street. There are a lot of reflections in glass here, and even an intense lens flare where the sun interacts with the lens elements. The scene has some well lit parts and other darker sections making this panorama very difficult to capture with one consistent set of camera settings. Unfortunately, to make sure the stitching process works smoothly, this is exactly what’s needed.